NVIDIA's Jetson line of development platforms is not new to Qt; a while ago we already talked about how to utilize OpenGL and CUDA in Qt applications on the Jetson TK1. Since then, most of Qt's focus has been on the bigger brothers, namely the automotive-oriented DRIVE CX and PX systems. However, this does not mean that the more affordable and publicly available Jetson TX1 devkits are left behind. In this post we are going to take a look how to get started with the latest Qt versions in a proper embedded device creation manner, using cross-compilation and remote deployment for both Qt itself and applications.
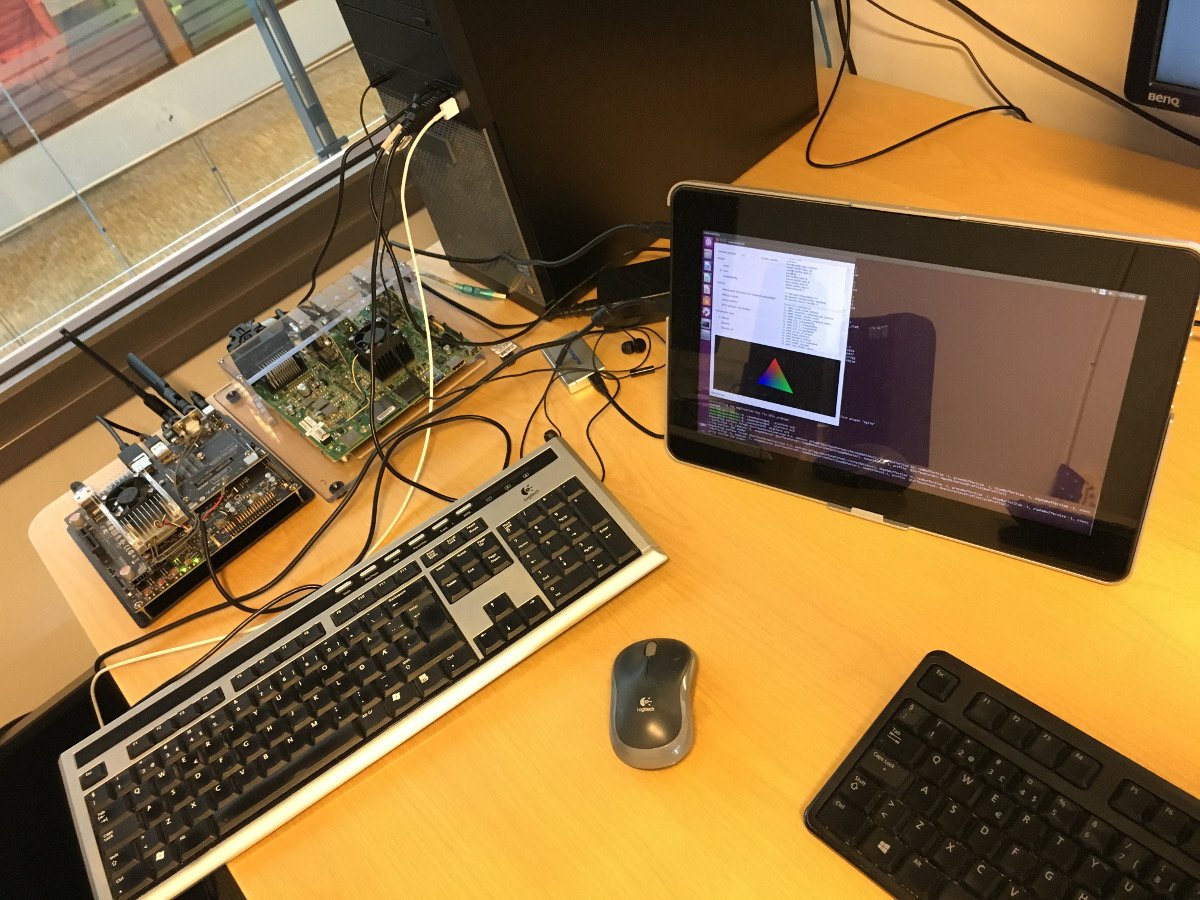
The photo above shows our TX1 development board (with a DRIVE CX sitting next to it), hooked up to a 13" touch-capable display. We are going to use the best-supported, Ubuntu 16.04-based sample root filesystem from Linux for Tegra R24.2, albeit in a bit different manner than what is shown here: instead of going for the default approach based on OpenGL + GLX via the xcb platform plugin, we will instead set up Qt for OpenGL ES + EGL via the eglfs. Our applications will still run on X11, but in fullscreen. Instead of building or developing anything on the device itself, we will follow the standard embedded practice of developing and cross-compiling on a Linux-based host PC.
Why this approach?
- Fast. While building on target is fully feasible with all the power the TX1 packs, it is still no match for compiling on a desktop machine.
- By building Qt ourselves we can test the latest version, or even unreleased snapshots from git, not tied to the out-of-date version provided by the distro (5.5).
- This way the graphics and input device configuration is under control: we are after EGL and GLES, with apps running in fullscreen (good for vsync, see below) and launched remotely, not a desktop-ish, X11-oriented build. We can also exercise the usual embedded input stack for touch/mouse/keyboard/tablet devices, either via Qt's own evdev code, or libinput.
- While we are working with X11 for now, the custom builds will allow using other windowing system approaches in the future, once they become available (Wayland, or just DRM+EGLDevice/EGLOutput/EGLStream).
- Unwanted Qt modules can be skipped: in fact in the below instructions only qtbase, qtdeclarative and qtgraphicaleffects get built.
- Additionally, with the approach of fine-grained configurability provided by the Qt Lite project, even the must-have modules can be tuned to include only the features that are actually in use.
Setting Up the Toolchain
We will use L4T R24.2, which features a proper 64-bit userspace.
After downloading Tegra210_Linux_R24.2.0_aarch64.tbz2 and Tegra_Linux_Sample-Root-Filesystem_R24.2.0_aarch64.tbz2, follow the instructions to extract, prepare and flash the device.
Verify that the device boots and the X11 desktop with Unity is functional. Additionally, it is strongly recommended to set up the serial console, as shown here. If there is no output on the connected display, which happened sometimes with our test display as well, it could well be an issue with the HDMI EDID queries: if running get-edid on the console shows no results, this is likely the case. Try disconnecting and reconnecting the display while the board is running.
Once the device is ready, we need a toolchain. For instance, get gcc-linaro-5.3.1-2016.05-x86_64_aarch64-linux-gnu.tar.xz from Linaro (no need for the runtime or sysroot packages now).
Now, how do we add more development files into our sysroot? The default system provided by the sample root file system in Linux_for_Tegra/rootfs is a good start, but is not sufficient. On the device, it is easy to install headers and libraries using apt-get. With cross-compilation however, we have to sync them back to the host as well.
First, let's install some basic dependencies on the device:
sudo apt-get install '.*libxcb.*' libxrender-dev libxi-dev libfontconfig1-dev libudev-dev
Then, a simple option is to use rsync: after installing new -dev packages on the target device, we can just switch to rootfs/usr on the host PC and run the following (replacing the IP address as appropriate):
 sudo rsync -e ssh -avz ubuntu@10.9.70.50:/usr/include .
 sudo rsync -e ssh -avz ubuntu@10.9.70.50:/usr/lib .
Almost there. There is one more issue: some symbolic links in rootfs/usr/lib/aarch64-linux-gnu are absolute, which is fine when deploying the rootfs onto the device, but pretty bad when using the same tree as the sysroot for cross-compilation. Fix this by running a simple script, for instance this one. This will have to be done every time new libraries are pulled from the target.
Graphics Considerations
By default Qt gets configured for GLX and OpenGL (supporting up to version 4.5 contexts). For EGL and OpenGL ES (up to version 3.2) we need some additional steps first:
The headers are missing by default. Normally we would install packages like libegl1-mesa-dev, however it is likely safer to avoid this and not risk pulling in the Mesa graphics stack, potentially overwriting the NVIDIA proprietary binaries. Run something like the following on the device:
 apt-get download libgles2-mesa-dev libegl1-mesa-dev
 ar x ...
 tar xf data.tar.xz (do this for both)
 sudo cp -r EGL GLES2 GLES3 KHR /usr/include
then rsync usr/include back into the sysroot on the host.
Library-wise we are mostly good, except one symlink. Do this on the device in /usr/lib/aarch64-linux-gnu:
sudo ln -s /usr/lib/aarch64-linux-gnu/tegra-egl/libGLESv2.so.2 libGLESv2.so
then sync the libraries back as usual.
Qt can now be configured with -opengl es2. (don't be misled by "es2", OpenGL ES 3.0, 3.1 and 3.2 will all be available as well; Qt applications will get version 3.2 contexts automatically due to the backwards compatible nature of OpenGL ES)
Configuring and Building Qt
Assuming our working directory for L4T and the toolchain is $HOME/tx1, check out qtbase into $HOME/tx1/qtbase (e.g. run git clone git://code.qt.io/qt/qtbase.git -b dev - using the dev branch, i.e. what will become Qt 5.9, is highly recommended for now because the TX1 device spec is only present there) and run the following:
 ./configure
 -device linux-jetson-tx1-g++
 -device-option CROSS_COMPILE=$HOME/tx1/gcc-linaro-5.3.1-2016.05-x86_64_aarch64-linux-gnu/bin/aarch64-linux-gnu-
 -sysroot $HOME/tx1/Linux_for_Tegra/rootfs
 -nomake examples
 -nomake tests
 -prefix /usr/local/qt5
 -extprefix $HOME/tx1/qt5
 -hostprefix $HOME/tx1/qt5-host
 -opengl es2
Note the dash at the end of the CROSS_COMPILE device option. It is a prefix (for aarch64-linux-gnu-gcc and others) so the dash is necessary.
This will be a release build. Add -force-debug-info if debug symbols are needed. Switching to full debug builds is also possible by specifying -debug.
Check the output of configure carefully, paying extra attention to the graphics bits. Below is an extract with an ideal setup:
Qt Gui:

  FreeType ............................... yes

    Using system FreeType ................ yes

  HarfBuzz ............................... yes

    Using system HarfBuzz ................ no

  Fontconfig ............................. yes

  Image formats:

    GIF .................................. yes

    ICO .................................. yes

    JPEG ................................. yes

      Using system libjpeg ............... no

    PNG .................................. yes

      Using system libpng ................ yes

  OpenGL:

    EGL .................................. yes

    Desktop OpenGL ....................... no

    OpenGL ES 2.0 ........................ yes

    OpenGL ES 3.0 ........................ yes

    OpenGL ES 3.1 ........................ yes

  Session Management ..................... yes

Features used by QPA backends:

  evdev .................................. yes

  libinput ............................... no

  mtdev .................................. no

  tslib .................................. no

  xkbcommon-evdev ........................ no

QPA backends:

  DirectFB ............................... no

  EGLFS .................................. yes

  EGLFS details:

    EGLFS i.Mx6 .......................... no

    EGLFS i.Mx6 Wayland .................. no

    EGLFS EGLDevice ...................... yes

    EGLFS GBM ............................ no

    EGLFS Mali ........................... no

    EGLFS Rasberry Pi .................... no

    EGL on X11 ........................... yes

  LinuxFB ................................ yes

  Mir client ............................. no

  X11:

    Using system provided XCB libraries .. yes

    EGL on X11 ........................... yes

    Xinput2 .............................. yes

    XCB XKB .............................. yes

    XLib ................................. yes

    Xrender .............................. yes

    XCB render ........................... yes

    XCB GLX .............................. yes

    XCB Xlib ............................. yes

    Using system-provided xkbcommon ...... no

Qt Widgets:

  GTK+ ................................... no

  Styles ................................. Fusion Windows
We will rely on EGLFS and EGL on X11 so make sure these are enabled. Having the other X11-related features enabled will not hurt either, a fully functional xcb platform plugin can come handy later on.
Now build Qt and install into $HOME/tx1/qt5. This is the directory we will sync to the device later under /usr/local/qt5 (which has to match -prefix). The host tools (i.e. the x86-64 builds of qmake, moc, etc.) are installed into $HOME/tx1/qt5-host. These are the tools we are going to use to build applications and other Qt modules.
 make -j8
 make install
On the device, create /usr/local/qt5:
 mkdir /usr/local/qt5
 sudo chown ubuntu:ubuntu qt5
Now synchronize:
rsync -e ssh -avz qt5 ubuntu@10.9.70.50:/usr/local
Building Applications and other Qt Modules
To build applications, use the host tools installed to $HOME/tx1/qt5-host. For example, go to qtbase/examples/opengl/qopenglwidget and run $HOME/tx1/qt5-host/bin/qmake, followed by make. The resulting aarch64 binary can now be deployed to the device, via scp for instance: scp qopenglwidget ubuntu@10.9.70.52:/home/ubuntu
The process is same for additional Qt modules. For example, to get Qt Quick up and running, check out qtdeclarative (git clone git://code.qt.io/qt/qtdeclarative.git -b dev) and do qmake && make -j8 && make install. Then rsync $HOME/tx1/qt5 like we did earlier. Repeat the same for qtgraphicaleffects, this will be needed by the Cinematic Experience demo later on.
Running Applications
We are almost ready to launch an application manually on the device, to verify that the Qt build is functional. There is one last roadblock when using an example from the Qt source tree (like qopenglwidget): these binaries will not have rpath set and there is a Qt 5.5.1 installation on the device, right there in /usr/lib/aarch64-linux-gnu. By running ldd on our application (qopenglwidget) it becomes obvious that it would pick that Qt version up by default. There are two options: the easy, temporary solution is to set LD_LIBRARY_PATH to /usr/local/qt5/lib. The other one is to make sure no Qt-dependent processes are running, and then wipe the system Qt. Let's choose the former, though, since the issue will not be present for any ordinary application as those will have rpath pointing to /usr/local/qt5/lib.
The default platform plugin is eglfs, with the eglfs_x11 backend, which does not do more than opening a fullscreen window. This is good enough for most purposes, and also eliminates one common source of confusion: the lack of vsync for non-fullscreen windows. In the default X11-based system there is apparently no vertical synchronization for OpenGL content, unless the window is fullscreen. This is the same behavior like with the Jetson TK1. Running the qopenglwidget example in a regular window will result in an unthrottled rendering rate of 500-600 FPS. Changing to showFullScreen() triggers the expected behavior, the application gets throttled to 60 FPS. Qt Quick is problematic in particular, because the default and best, threaded render loop will result in bad animation timing if vsync-based throttling is not active. This could be worked around by switching to the less smooth basic render loop, but the good news is that with eglfs the problem will not exist in the first place.
Input is handled via evdev, skipping X11. The device nodes may need additional permissions: sudo chmod a+rwx /dev/input/event* (or set up a udev rule). To debug the input devices on application startup, do export QT_LOGGING_RULES=qt.qpa.input=true. If needed, disable devices (e.g. the mouse, in order to prevent two cursors) from X11 via the xinput tool (xinput list, find the device, find the enabled property with xinput list-props, then change it to 0 via xinput set-prop).
And the end result:
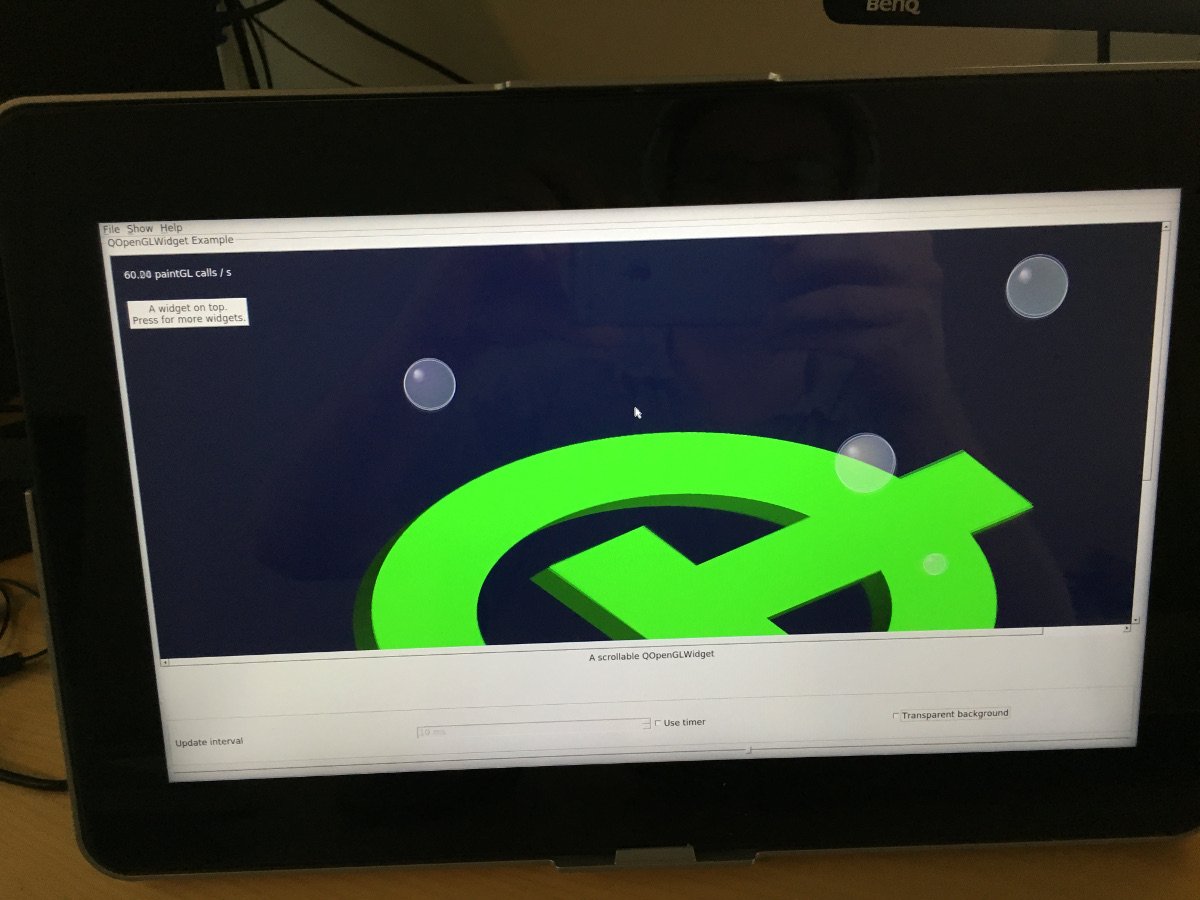
qopenglwidget, a mixed QWidget + QPainter via OpenGL + custom OpenGL application
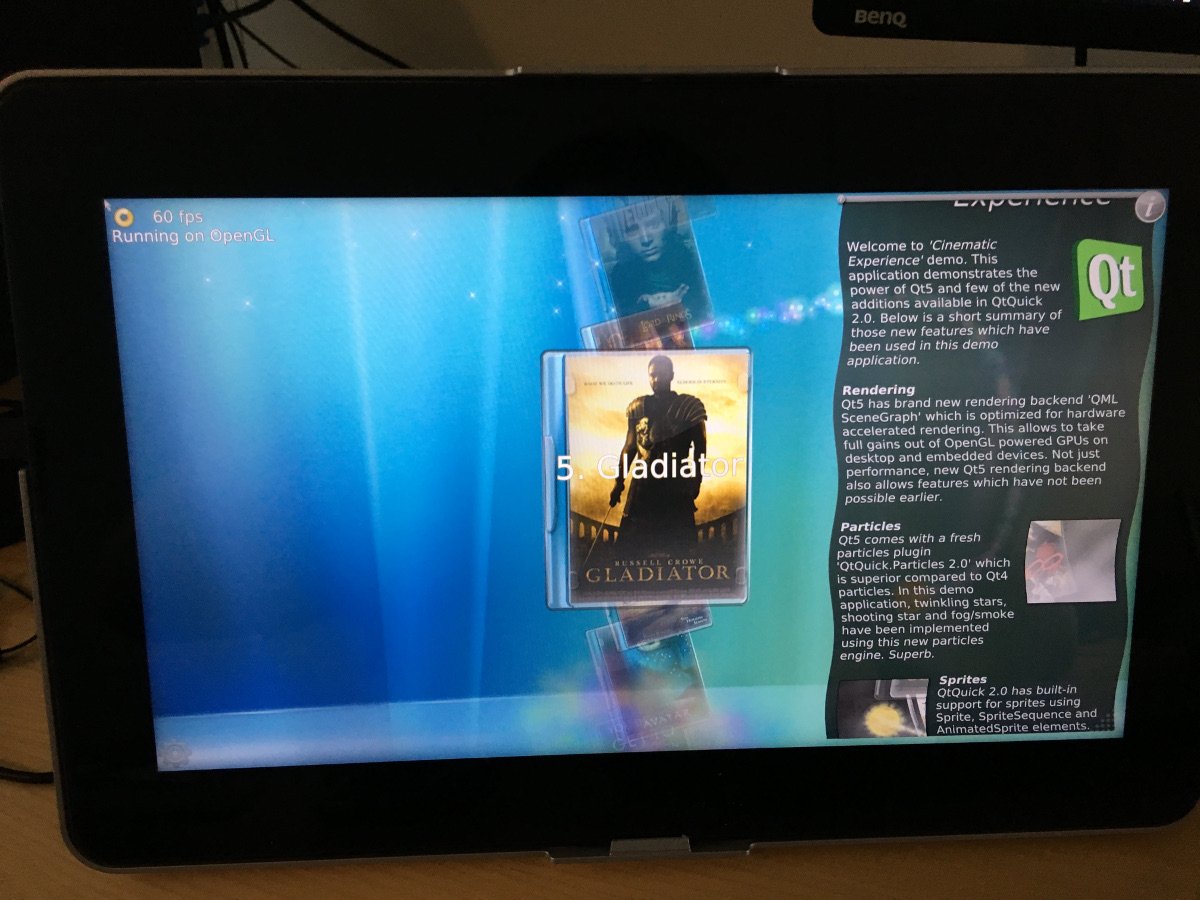
The Qt 5 Cinematic Experience demo (sources available on GitHub) for Qt Quick, with fully functional touch input
Qt Creator
Building and deploying applications manually from the terminal is nice, but not always the most productive approach. What about Qt Creator?
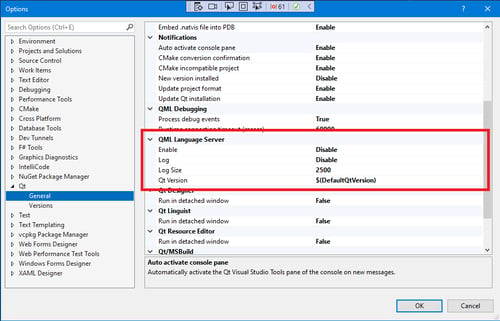
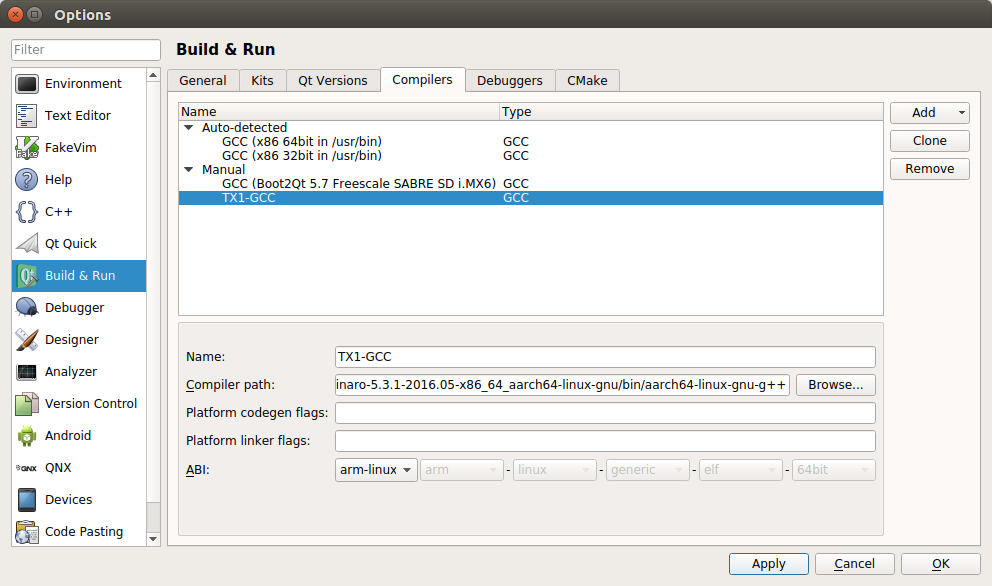
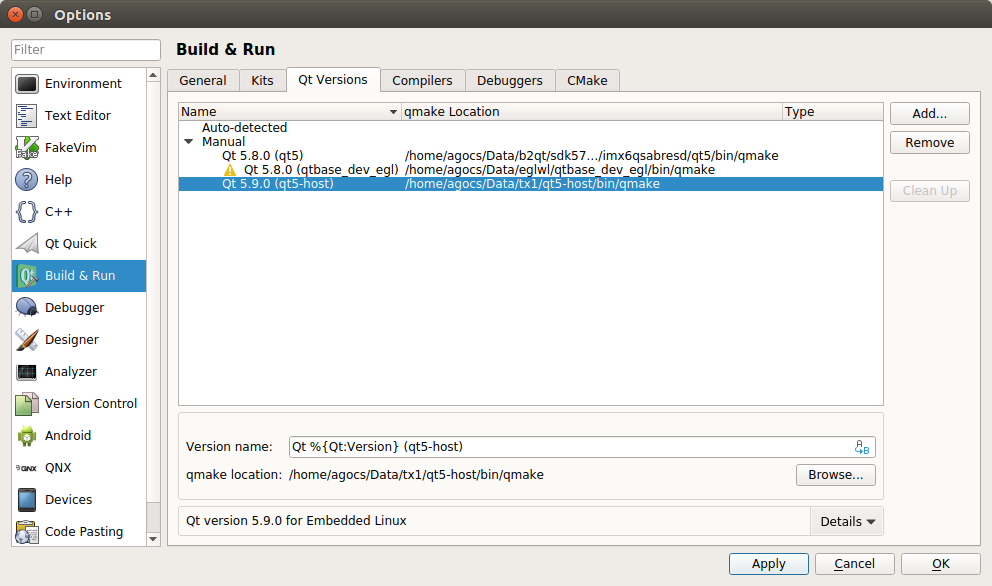
Let's open Qt Creator 4.1 and the Build & Run page in Options. At minimum, we have to teach Creator where our cross-compiler and Qt build can be found, and associate these with a kit.
Go to Compilers, hit Add, choose GCC. Change the Name to something more descriptive. The Compiler path is the g++ executable in our Linaro toolchain. Leave ABI unchanged. Hit Apply.
Now go to Qt Versions, hit Add. Select qmake from qt5-host/bin. Hit Apply.
Go to Kits, hit Add. Change the Name. Change the Device type to Generic Linux Device. Change Sysroot to Linux_for_Tegra/rootfs. Change the Compiler to the new GCC entry we just created. Change Qt version to the Qt Versions entry we just created. Hit Apply.
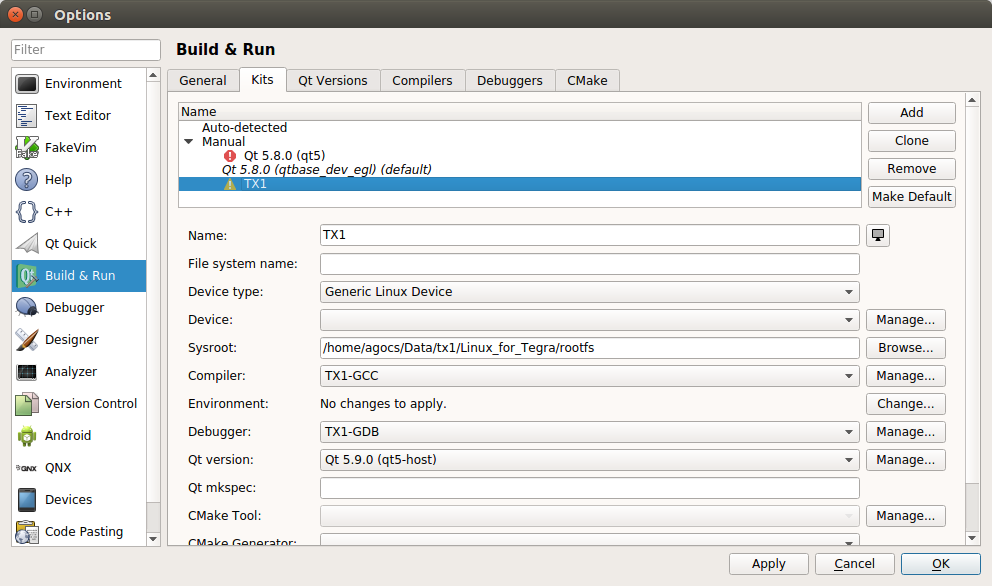
That is the basic setup. If gdb is wanted, it has to be set up under Debuggers and Kits, similarly to the Compiler.
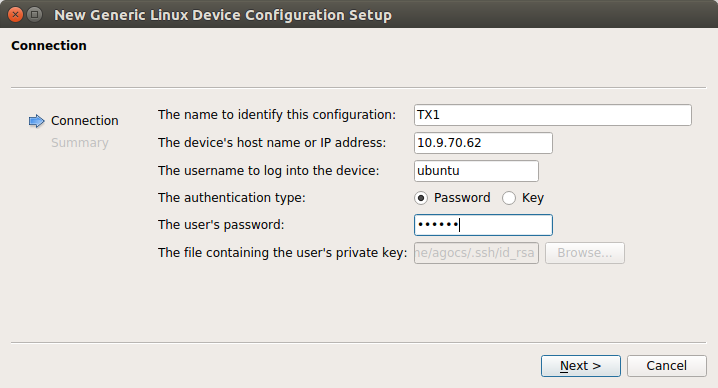
Now go to the Devices page in Options. Hit Add. Choose Generic Linux Device and start the wizard. Enter the IP address and ubuntu/ubuntu as username and password. Hit Next and Finish. The testing should succeed. There is no need to associate this Device with the Kit if there is only one Generic Linux Device, but it may become necessary once there are multiple devices configured.
Building and Deploying from Qt Creator
Let's check out the Cinematic Experience demo sources: git clone https://github.com/alpqr/qt5-cinematic-experience.git. In the Configure Project page, select only the kit just created. The configuration is Release since our Qt build was release only. Hit Configure Project. When creating a new project, the approach is the same: make sure the correct kit is selected.
Build the project. Creator will now correctly pick up the cross-compilation toolchain. The result is an ARM binary on our host PC. Let's deploy and run it.
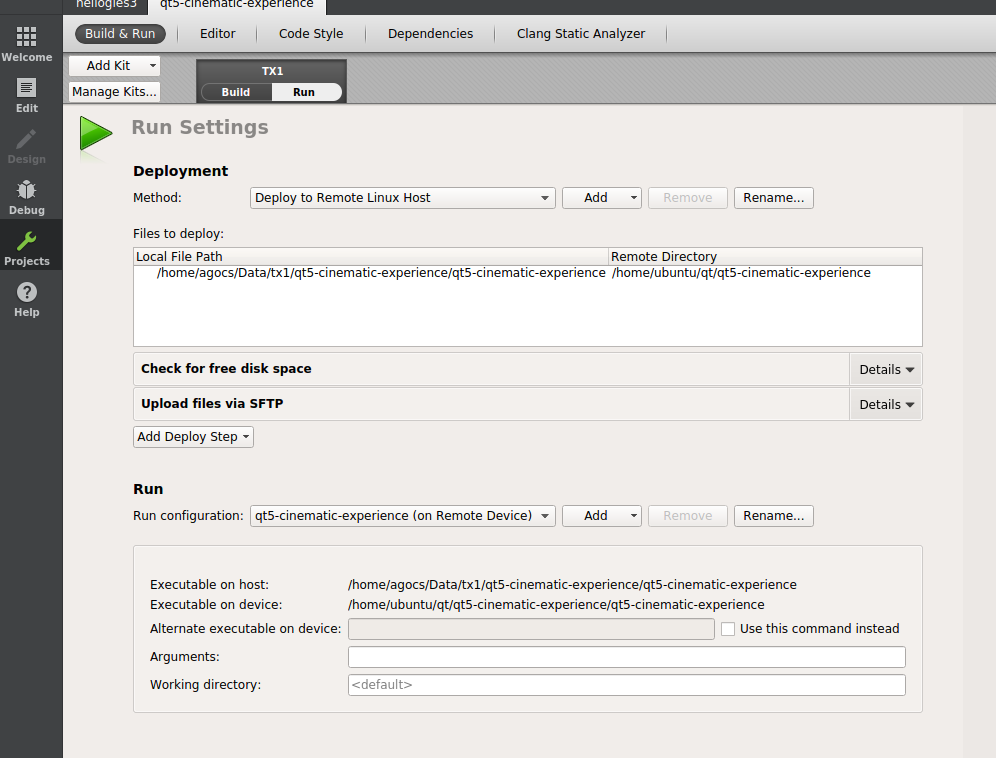
Choose Deploy. This will likely fail, watch the output in the Compile Output tab (Alt+4). This is because the installation settings are not yet specified in the .pro file. Check this under Run settings on the Projects page. The list in "Files to deploy" is likely empty. To fix this, edit qt5-cinematic-experience.pro and add the following lines at the end:
 target.path = /home/ubuntu/qt/$$TARGET
 INSTALLS += target
After this, our deployment settings will look a lot better:
Choose Run (or just hit Ctrl+R). Creator now uploads the application binary to the device and launches the application remotely. If necessary, the process can also be killed remotely by hitting the Stop button.
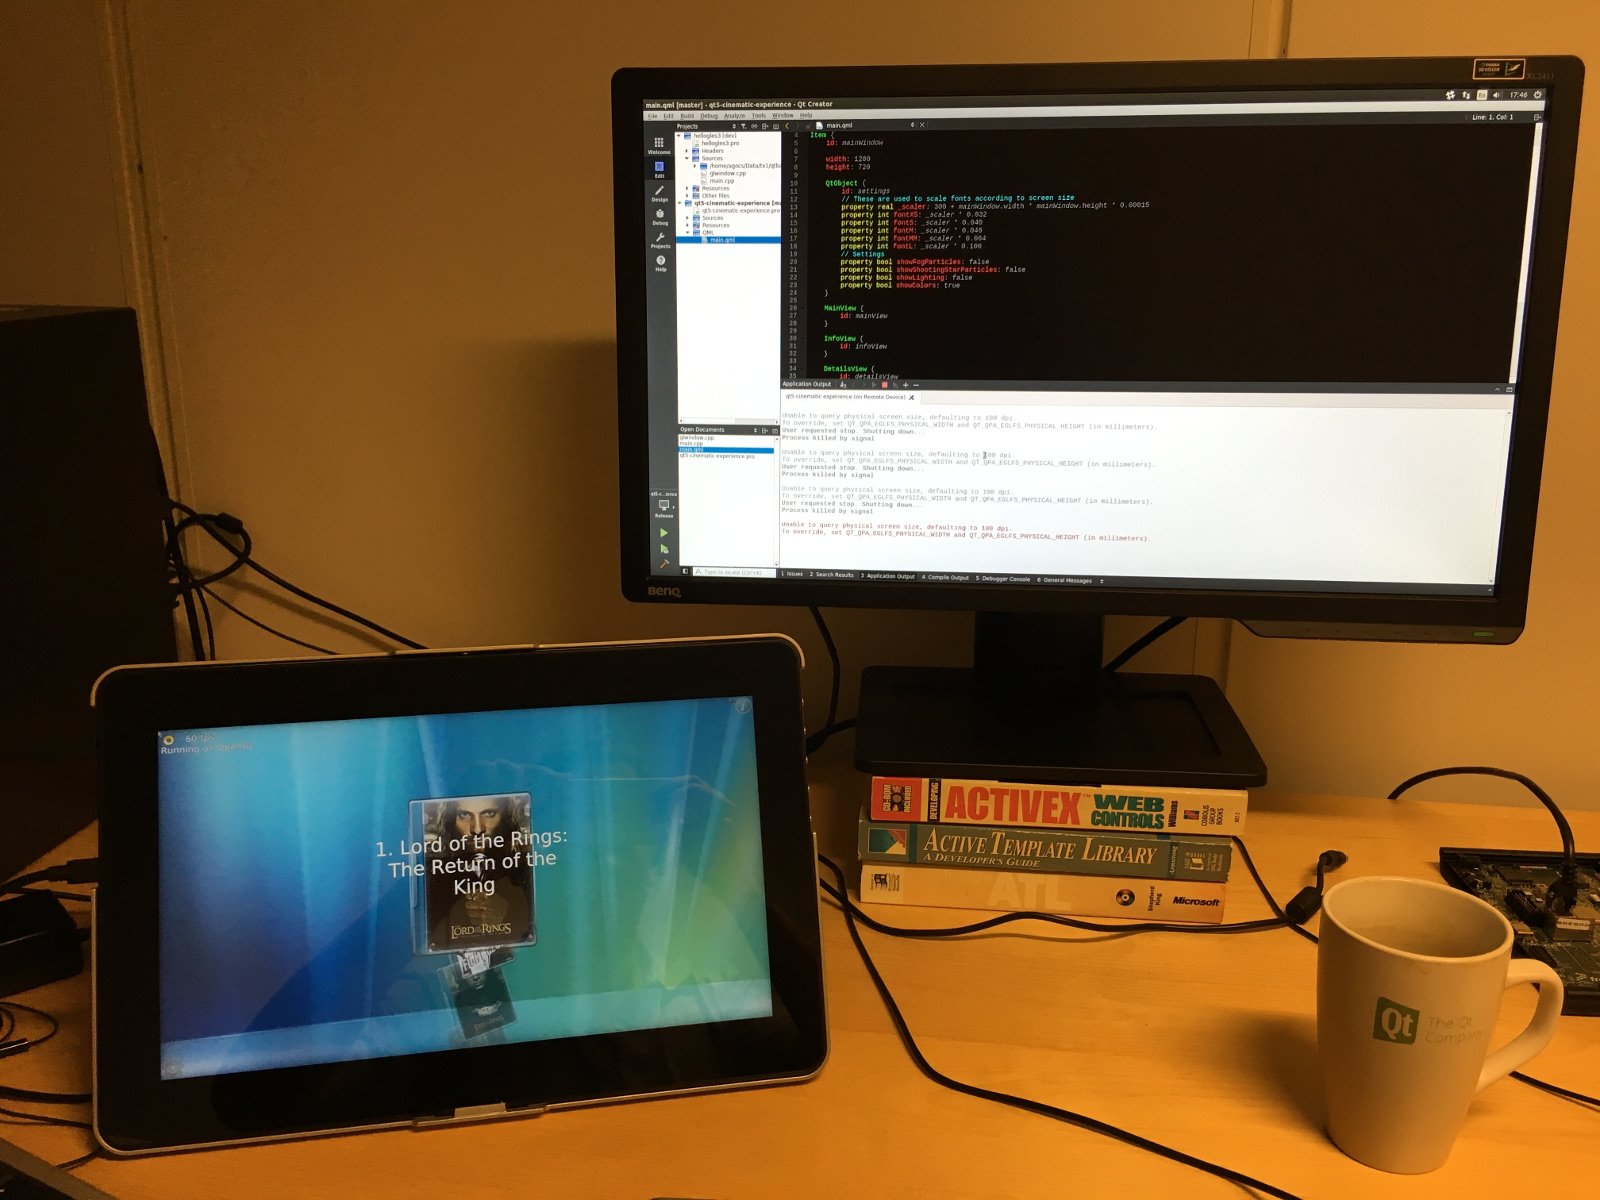
The host and the target
This means that from now on, when doing further changes or developing new applications, the changes can be tested on the device right away, with just a single click.
What's Next
That's all for now. There are other interesting areas, multimedia (accelerated video, camera), CUDA, and Vulkan in particular, which unfortunately do not fit in this single post but may get explored in the future. Another future topic is Yocto support and possibly a reference image in the Qt for Device Creation offering. Let us know what you think.