One of the interesting things about working with Qt is seeing all the unexpected ways our users use the APIs we create. Last year I got a bug report requesting an API to set a custom frame rate for QML animations when using QQuickRenderControl. The reason was that the user was using QQuickRenderControl as an engine to render video output from Qt Quick, and if your target was say 24 frames per second, the animations were not smooth because of how the default animation driver behaves. So inspired by this use case I decided to take a stab at creating such an example myself.
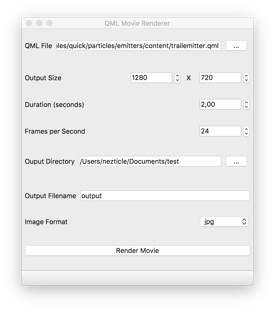
This may not be the most professional looking User Interface, but what it does is still pretty neat. The objective is to feed it an animated QML scene and it should output an image file for each frame of the animation. These images can then be converted into a video or animated image using an external tool. The challenge is that Qt Quick is a UI tool, not a movie generator.
The naive approach to this would be to create a QQuickWindow, set the window size to the output target size, and then grab the frame by calling QQuickWindow::grabWindow() each time the frameSwapped() signal is emitted. There are a couple of issues with this approach though. First is that the video would need to render in realtime. If you wanted to render an animation that was 5 minutes long, it would take 5 minutes because it would just be like recording your application for 5 minutes. The second issue is that under the best case scenario you would be rendering video at the refresh rate of your monitor. This would even require a reasonably powerful machine, because the QQuickWindow::grabWindow() call involves a glReadPixels call which is quite expensive. It is also problematic if you need to render at a different frame rate than your monitor refresh (which is what the user that inspired me was complaining about). So here is how I addressed both of these issues.
QQuickRenderControl
QQuickRenderControl is a magical class that lets you do all kinds of crazy things with Qt Quick content. For our purposes we will use it to render Qt Quick content to an offscreen surface as fast as we can. Rather than creating an on-screen QQuickWindow, we can create a dummy QQuickWindow and via render control we can render content to an QOpenGLFramebufferObject instead.
    // Setup Format
    QSurfaceFormat format;
    format.setDepthBufferSize(16);
    format.setStencilBufferSize(8);
    // Setup OpenGL Context
    m_context = new QOpenGLContext;
    m_context->setFormat(format);
    m_context->create();
    // Setup dummy Surface (to create FBO with)
    m_offscreenSurface = new QOffscreenSurface;
    m_offscreenSurface->setFormat(m_context->format());
    m_offscreenSurface->create();
    // Setup Render Control and dummy window
    m_renderControl = new QQuickRenderControl(this);
    m_quickWindow = new QQuickWindow(m_renderControl);
    // Setup QML Engine
    m_qmlEngine = new QQmlEngine;
    if (!m_qmlEngine->incubationController())
        m_qmlEngine->setIncubationController(m_quickWindow->incubationController());
    // Finish it all off
    m_context->makeCurrent(m_offscreenSurface);
    m_renderControl->initialize(m_context);
The above gets QQuickRenderControl setup, then when the size is know and you can actually create the QOpenGLFramebuffer object and tell the dummy QQuickWindow thats where it will be rendering.
void MovieRenderer::createFbo()
{
    m_fbo = new QOpenGLFramebufferObject(m_size * m_dpr, QOpenGLFramebufferObject::CombinedDepthStencil);
    m_quickWindow->setRenderTarget(m_fbo);
}
And once that is done it's just a matter of loading up the QML content and rendering it. Unlike with QQuickWindow, QQuickRenderControl allows you to control when the steps of the rendering process occurs. In our case we want to render as fast as possible so this is what our rendering setup looks like:
void MovieRenderer::renderNext()
{
    // Polish, synchronize and render the next frame (into our fbo).
    m_renderControl->polishItems();
    m_renderControl->sync();
    m_renderControl->render();
    m_context->functions()->glFlush();
    m_currentFrame++;
    // Grab the contents of the FBO here ...
    if (m_currentFrame < m_frames) {
        // Schedule the next update
        QEvent *updateRequest = new QEvent(QEvent::UpdateRequest);
        QCoreApplication::postEvent(this, updateRequest);
    } else {
        //Finished cleanup();
    }
}
bool MovieRenderer::event(QEvent *event) {
    if (event->type() == QEvent::UpdateRequest) {
        renderNext();
        return true;
    }
    return QObject::event(event);
}
The above sets up an event driven loop that will render as fast as possible while still handling events between frames, which is needed for progressing animations with Qt Quick.
Custom QAnimationDriver
The second issue we need to address is that the animation behavior is wrong. To remedy this we need a custom QAnimationDriver that enables us to advance animations at our own frame rate. The default behavior is to try and advance the animation's in steps as close as possible to the refresh rate of the monitor your application is running on. Since we never present the content we render to the screen that behavior doesn't make sense for us. Instead we can install our own QAnimationDriver which can be manually advanced each frame we generate based on a pre-determined frame rate. Here is the whole implementation of my custom Animation driver:
class AnimationDriver : public QAnimationDriver
{
public:
    AnimationDriver(int msPerStep)
        : m_step(msPerStep)
        , m_elapsed(0)
    {}
    void advance() override
    {
        m_elapsed += m_step;
        advanceAnimation();
    }
    qint64 elapsed() const override
    {
        return m_elapsed;
    }
private:
    int m_step;
    qint64 m_elapsed;
};
Now to use this you just need to install the new QAnimationDriver. When you call QAnimationDriver::install() it will replace the current one, so Qt Quick will then behave like we need it to. When we start the movie renderer we also install the custom AnimationDriver:
    m_frames = m_duration / 1000 * m_fps;
    m_animationDriver = new AnimationDriver(1000 / m_fps);
    m_animationDriver->install();
    // Start the renderer
    renderNext();
And finally since we control the render loop, we need to manually advance the animation driver. So before the end of the renderNext() method make sure to call:
m_animationDriver->advance();And that is it. Now we can render as fast as possible, and our animation engine will step perfectly for the frame rate we are generate frames for. It is important to remember that you must process events after calling advance() on your animations though, because these are handled through the Qt Event and Signal and Slots system. If you don't do this, then you will generate the same frame many times.
Results
Once you run the MovieRenderer you end up with a folder full of images representing each frame. To prepare video files from the generated output I used ffmpeg:
ffmpeg -r 24 -f image2 -s 1280x720 -i output_%d.jpg -vcodec libx264 -crf 25 -pix_fmt yuv420p hello_world_24.mp4In the above command it will generate a 720p video at 24 fps from a series of files called output_*.jpg. It would also be possible to create an example that either called this tool for you via QProcess, or even included an encoder library to generate the video directly. I went for the simplest approach using only what Qt had built-in for this example. Here are a few example movies I generated:
https://youtu.be/D42ieFsOkV0
https://youtu.be/bd7EGC2FVH8
This first video is rendered at 60 FPS and the second is at 24 FPS. Notice how they animate at the same speed but one is smoother than the other. This is the intended behavior in action.
Well thats all I have to show, the rest is up to you. I've published the code for the QML Movie Renderer here so go check it out now! I hope this example inspires you as well to make other cool projects, and I look forward to seeing what new unexpected ways you'll be using Qt in the future.