Starting on August 1st, Google Play will no longer accept new applications or application updates without a 64-bit version (unless of course there is no native code at all). For Qt users, this means you have to build an additional APK that contains the 64-bit binaries.
Qt has shipped 64-bit binaries for Android since Qt 5.12.0, so complying with the new requirement is technically no big deal. But after discussing with users, I see that it is not clear to everyone exactly how to set up an app in Google Play that supports multiple architectures at once.
This call for help, combined with the fact that I am currently setting up a fresh Windows work station, made for a golden opportunity to look at Qt for Android app development in general. In this blog, I will start with a clean slate and show how to get started on Android, as well as how to publish an app that complies with the Google Play requirements.
I will
- guide you through the installation steps needed to get a working environment,
- describe the process of building an application for multiple architectures,
- and show you how to upload your binaries to Google Play.
The first few parts might be familiar to many of you, so if you get bored and want to hear about the main topic, feel free to skip right to Step 4.
A note about SDK versions
The Android SDK is itself under heavy development, and quite often it isn't backwards compatible, causing problems with our integration in Qt. We react as quickly as we can to issues that arise from changes or regressions in the SDK, but a general rule of thumb is to wait before you upgrade to the latest and greatest versions of the Android tools until we have had a chance to adapt to incompatibilities in Qt.
While there have been some issues on other platforms as well, the majority of the problems we have seen have been on Windows. So if you are on this host system, be extra aware to check for known good versions before setting up your environment.
We are currently recommending the use of the following tools together with Qt 5.13.0:
- Android build tools version 28
- Android NDK r19
- Java Development Kit 8
If you do bump into some problems, please make sure to check our known issues page to see if there is any updated information.
Now for the details on where and how to get the right versions of everything.
Step 1: Installing the JDK
Android is primarily a Java-based platform, and while you can write your Qt applications entirely in C++ and/or QML, you will need the Java Development Kit in order to compile the files that make the integration possible.
Note that there is an incompatibility between Android's SDK Manager tool and the later versions of Oracle's JDK, making the latest JDK versions unusable together with the Android environment. To work around this, we recommend that you download JDK version 8 for use with Android.
You may use the official binaries from Oracle, or an alternative, such as the AdoptOpenJDK project.
Download and run the installer and install it in the default location.
Step 2: Setting up the Android environment
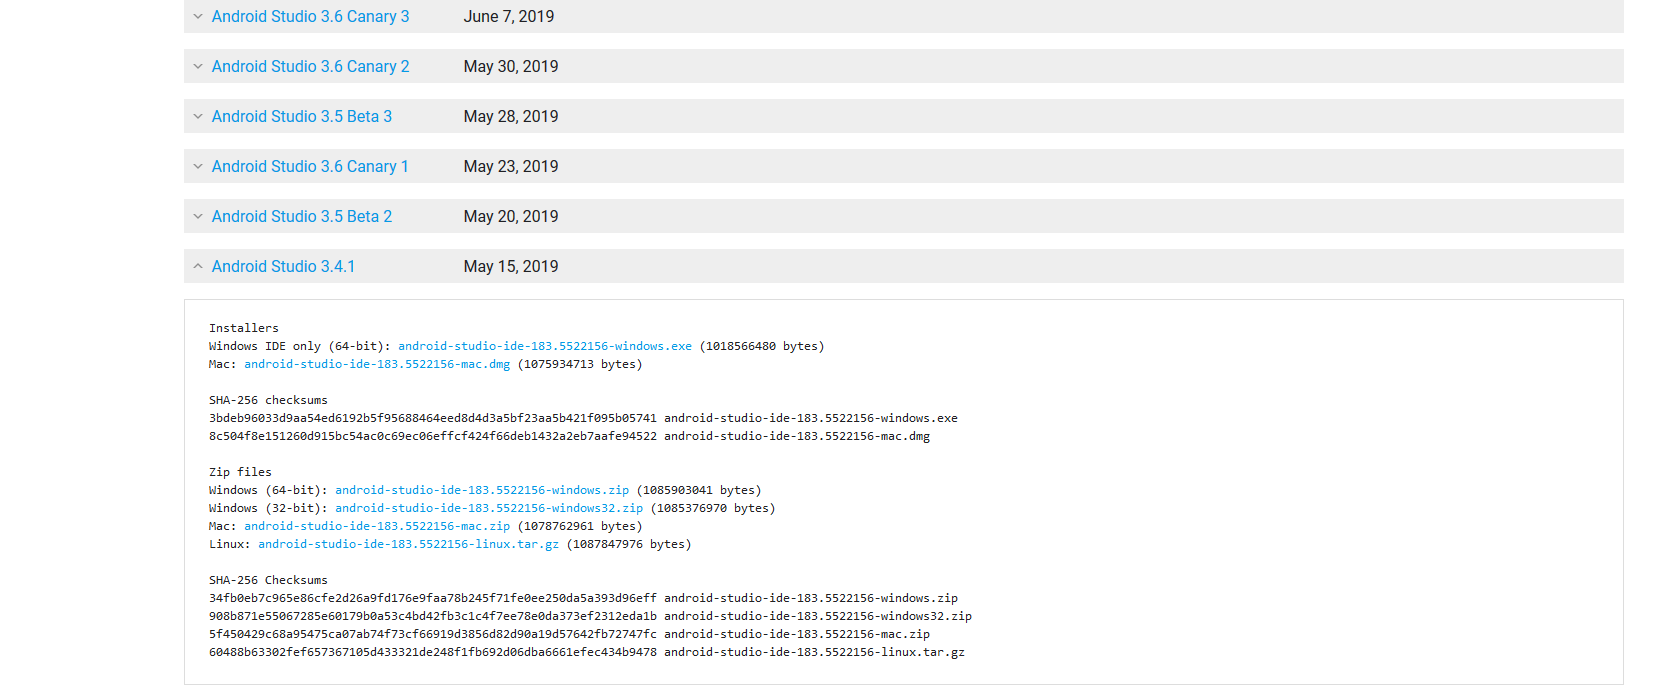
The second step is getting the actual Android development environment. Start by downloading and installing Android Studio. Scroll past the different "beta" and "canary" releases, and you will find the latest stable release.
Once the Android Studio has been installed, you can use this to install the "SDK Platform" for you. This is the actual collection of Java classes for a particular Android distribution. When you start Android Studio the first time, it should prompt you to install the SDK Platform. You can safely use the latest version of the SDK, platform 29, which is the suggested default.
In addition to the SDK, we also need to install the NDK. This is the development kit used for cross-compiling your C++ code to run on Android. As mentioned above, we will use Android NDK r19c and not the latest release, since there are issues with Android NDK r20 causing compilation errors. The issue will be been addressed in Qt 5.13.1 and Qt 5.12.5, so when you start using those, then upgrading to Android NDK r20 is possible.
And as a final step, we need to make sure that we are using version 28.0.3 of the Android build tools rather than the latest version. Note that this is only an issue on Windows hosts.
From the starting dialog box of Android Studio, click on Configure and then select SDK Manager. Go to the SDK Tools tab and make sure Show Package Details is checked. Under the Android build tools, make sure you deselect 29.0.0 and select 28.0.3 instead.
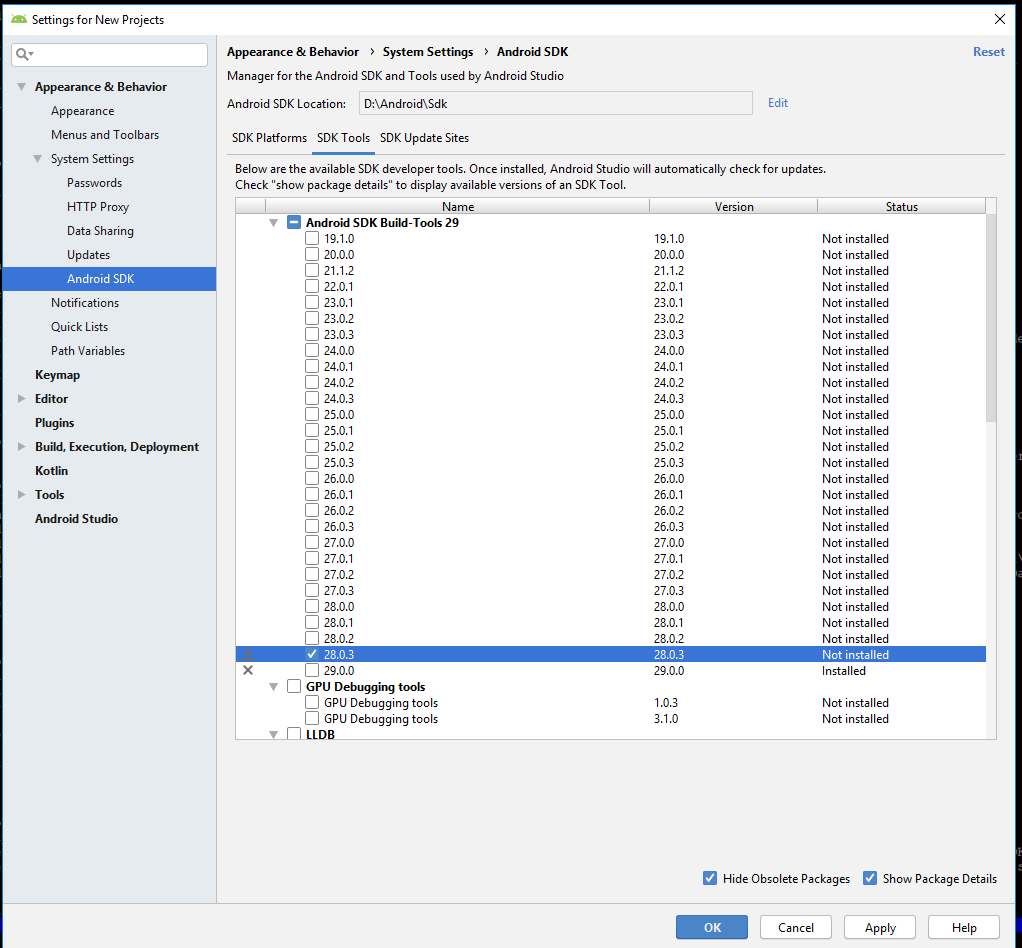
This will uninstall the non-functioning version of the build tools and install the older one. Click Apply to start the process, and when it is done you will have installed a functioning Android environment.
Step 3: Install Qt
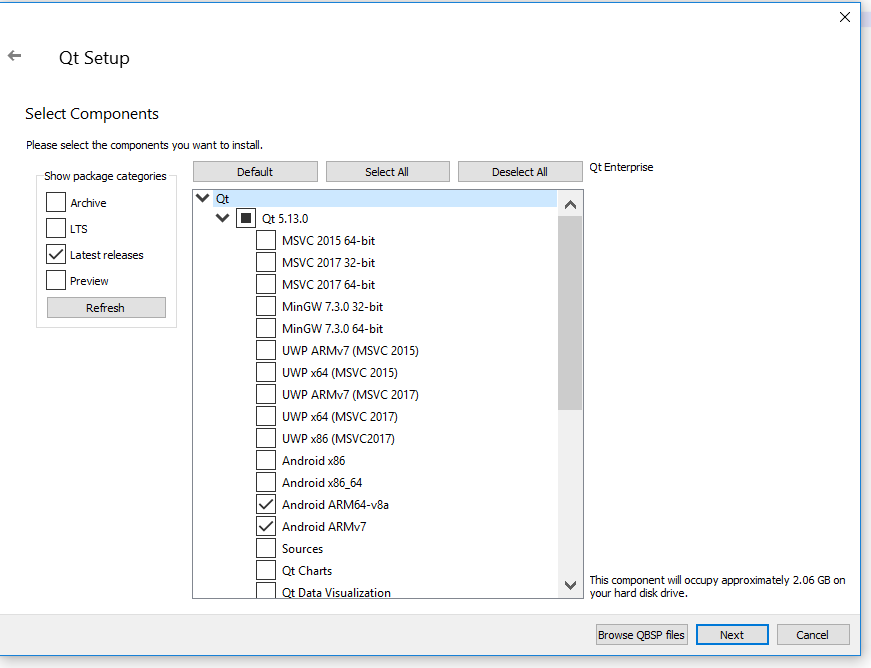
For this guide, we will be using Qt 5.13.0. If you haven't already, start by downloading the online installer tool from your Qt Account.
When you run the installer, make sure you select the arm64-v8a and armv7a target architectures. These are technical names for, respectively, the 64-bit and 32-bit versions of the ARM family of processors, which is the most commonly used processors on Android devices.
Note: For this example in particular, we will also need Qt Purchasing, since it contains the application I am planning to use as demonstration. This can also be selected from the same list.
When Qt is finished installing, start Qt Creator and open the Options. Under Devices, select the Android tab and select the directories where you installed the different packages in the previous steps.
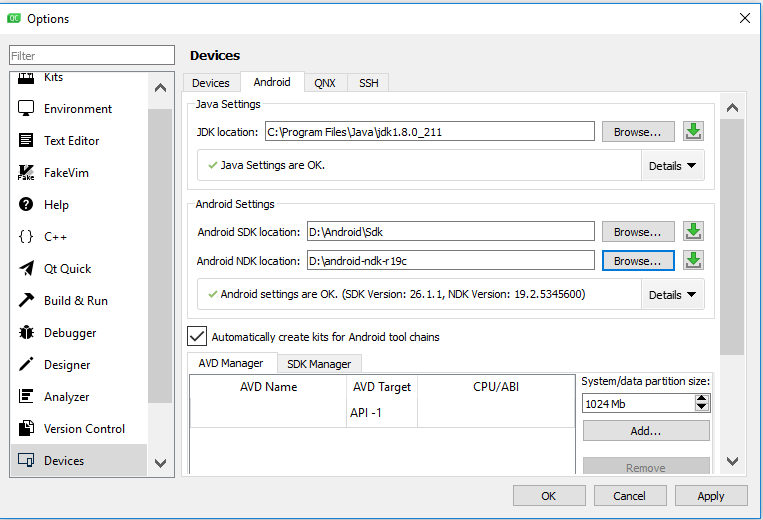
If everything is set up correctly, Qt Creator will show a green check mark, and you will be ready to do Android development with Qt.
Step 4: Setting up project in Qt Creator
For this example, I will use the Qt Hangman example. This is a small example we made to show how to implement in-app purchases in a cross-platform way.
First we open the example in Qt Creator, which can be done from the Welcome screen. Once it has been opened, Qt Creator will ask us to select which Qt versions we want to use for building it.

Select both the 64-bit and 32-bit versions of Qt and click Configure Project.
In order to comply with the additional requirements in Google Play, we want to create two APK packages: One for 32-bit devices and one for 64-bit devices. We need to configure each of these separately.

This screenshot shows an example setup for the 32-bit build. Important things to notice here:
- Use a different shadow build directory for each of the builds.
- Make sure you select the Release configuration.
- You should also tick the Sign package checkbox to sign your package, otherwise the Google Play store will reject it.
With the exception of the build directory, the setup for the 64-bit build should be the same. Select the 64-bit kit on the left-hand side and make the equivalent adjustments there.
Step 5: Preparing the manifest
In addition, the two packages will need identical AndroidManifest.xml files, except for one detail: The version code of the two has to differ. The version code can be pretty much anything you choose, as long as you keep in mind that when an APK is installed on a device from the store, it will select the APK with the highest version code. As Qt user Fabien Chéreau poined out in a comment to a bug report, you therefore typically want to set the version code of the 64-bit version to be higher than for the 32-bit version, so that a device which supports both will prefer the 64-bit one.
As Felix Barz pointed out in the same thread, this can be automated in the .pro file of the project. Here is my slightly modified version of his code:
defineReplace(droidVersionCode) {
        segments = $$split(1, ".")
        for (segment, segments): vCode = "$$first(vCode)$$format_number($$segment, width=3 zeropad)"
        contains(ANDROID_TARGET_ARCH, arm64-v8a): \
            suffix = 1
        else:contains(ANDROID_TARGET_ARCH, armeabi-v7a): \
            suffix = 0
        # add more cases as needed
        return($$first(vCode)$$first(suffix))
}
VERSION = 1.2.3
ANDROID_VERSION_NAME = $$VERSION
ANDROID_VERSION_CODE = $$droidVersionCode($$ANDROID_VERSION_NAME)
This neat trick (thanks, Felix!) will convert the application's VERSION to an integer and append a new digit, on the least significant end, to signify the architecture. So for version 1.2.3 for instance, the version code will be 0010020030 for the 32-bit package and 0010020031 for the 64-bit one.
When you generate an AndroidManifest.xml using the button under Build APK in the project settings, this will automatically pick up this version code from the project. Once you have done that and edited the manifest to have your application's package name and title, the final step is to build the package: First you do a build with one of the two kits, and then you must activate the other kit and do the build again.
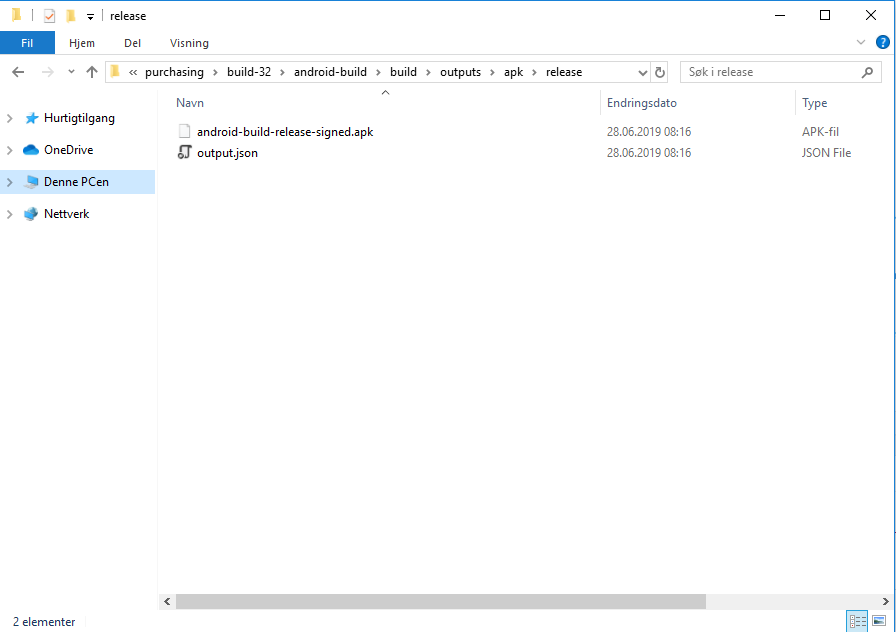
When you are done, you will have two releasable APK packages, one in each of the build directories you set up earlier. Relative to the build directory, the package will be in android-build\build\outputs\apk\release.
Note that for a more efficient setup, you will probably want to automate this process. This is also quite possible, since all the tools used by Qt Creator can be run from the command line. Take a look at the androiddeployqt documentation for more information.
Step 6: Publish the application in Google Play
The Google Play publishing page is quite self-documenting, and there are many good guides out there on how to do this, so I won't go through all the steps for filling out the form. In general, just fill out all the information it asks for, provide the images it needs, and make sure all the checkmarks in the left side bar are green. You can add all kinds of content here, so take your time with it. In the end, it will have an impact on how popular your app becomes.
Once that has been done, you can create a new release under App Releases and upload your APKs to it.
One thing to note is that the first time you do this, you will be asked if you want to allow Google Play to manage your app signing key.

For now, you will have to select to Opt Out of this. In order to use this feature, the application has to be in the new "Android App Bundle" format. This is not yet supported by Qt, but we are working to support this as well. In fact, Bogdan Vatra from KDAB (who is also the maintainer of the Android port of Qt) has already posted a patch which addresses the biggest challenge in getting such support in place.
When we do get support for it, it will make the release process a little bit more convenient. With the AAB format, Google Play will generate the optimized APKs for different architectures for us, but for now we have to do this manually by setting up multiple kits and building multiple APKs, as I have described in this tutorial.
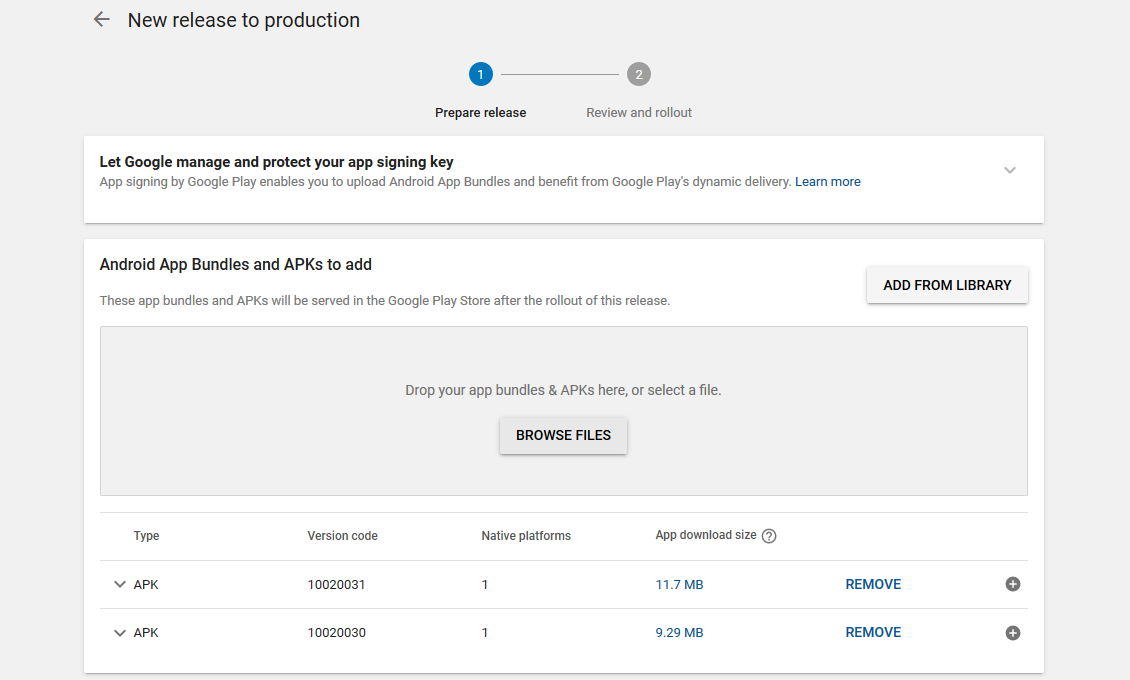
When the two APKs have been uploaded to a release, you should see a listing such as this: Two separate APK packages, each covering a single native platform. By expanding each of the entries, you can see what the "Differentiating APK details" are. These are the criteria used for selecting one over the other when a device is downloading the APK from the Google Play Store. In this case, the differentiating detail should be the native platform.
And that is all there is to it: Creating and releasing a Qt application in Google Play with both 32-bit and a 64-bit binaries. When the APKs have been uploaded, you can hit Publish and wait for Google Play to do its automated magic. And if you do have existing 32-bit apps in the store at the moment, make sure you update them with a 64-bit version well before August 2021, as that is when non-compliant apps will no longer be served to 64-bit devices, even if they also support 32-bit binaries.
Until then, happy hacking and follow me on Twitter for irregular updates and fun curiosities.